
Vegan Kimchi

This post has been years in the making.... After many, many batches of kimchi, I've finally settled on the proportions and flavors that make me crave this year-round. I modified Maangchi's recipe over the years to suit my tastes, and highly recommend you check out her recipe and video (I'm a HUGE fan)! For me, kimchi is definitely a labor of love, but that's why I make about 10 lbs at a time. However, You can comfortably scale this recipe up or down. Once the kimchi is fermenting, it stays good for months and months in the fridge as long as you always make sure that you press down the kimchi until the liquid covers the top before putting it away. I enjoy this as a side dish, and also use it to make kimchi pancakes, kimchi fried rice, and kimchi stew. The most important note I have is that you have to use good Korean red pepper flakes- they are smoky and spicy and give kimchi it's beautiful red color.
Ingredients
5 lbs napa cabbage
1/2 cup kosher salt
3 cups water
1/2 cup sweet rice flour
3 tbsp cane sugar
1/4 cup of crushed garlic (~1 medium size head of garlic)
1/4 cup of grated ginger
1 cup thinly sliced onion
1/2 cup of soy sauce
2 tbsp coconut aminos
1.5 cups of Korean hot red pepper flakes
2 lbs Korean or daikon radish, cut into 2-inch long matchsticks
12 oz carrots, cut into 2-inch long matchsticks
6 oz scallions, thinly sliced
3 oz chives, finely chopped
Directions
Prepare the cabbage
1. Cut the cabbage into bite-size pieces: Cut the napa cabbage in half lengthwise. Then, cut each half in half again to make quarters. Then, cut each quarter in half. You should have 8 lengthwise pieces. Cut the core out of each piece. Then, cut each piece horizontally into approximate 2-inch pieces (see Photo 1). As you cut the bite-sized pieces, put them into a really large pot so you can easily wash and salt it in later steps.
2. Wash the cabbage: Fill the pot that has the cabbage pieces with cold water. Gently wash the cabbage, then drain the water away.
3. Salt the cabbage: Add the kosher salt to the drained cabbage pieces. Toss well so that the salt gets distributed. Let this sit undisturbed for 30 minutes. Then, gently toss the cabbage so the top pieces end up at the bottom (we’re trying to evenly salt all the pieces). Let this sit for another 30 minutes. Gently toss the cabbage a second time. Let it sit for another 30 minutes. The cabbage should be sitting with the salt for a total of 1.5 hours and will shrink a lot as it sits (Photo 2).
4. Rinse the cabbage: After 1.5 hours, drain off the salty water. Fill the pot with cold water and gently rinse the cabbage really well- drain and repeat. I rinse the cabbage with three rounds of cold water to make sure all the extra salt is washed off. Drain off the water and let the cabbage sit in a strainer until Step 11.
Prepare the seasoning paste
5. Put the water and sweet rice flour in a large pot. Bring this to a boil over medium heat, stirring constantly.
6. After about 5 minutes of boiling, add the sugar and continue cooking for 3 minutes, until the mixture thickens enough to coat the back of a spoon. Remove the pot from the heat.
7. Mix in the garlic, ginger, and onion (see Photo 3).
8. Mix in the soy sauce, coconut aminos, and Korean red pepper (see Photo 4).
9. Let this cool to room temperature.
Mix everything together and ferment
10. In a large pot, mix together the cooled seasoning paste, radish, carrots, scallions, and chives (Photo 5).
11. Mix in the cabbage (Photo 6).
12. Tightly pack into glass jars or airtight containers that you don’t mind turning into kimchi containers. I use two 5-pound plastic yogurt containers (Photo 7). After you fill your container(s) up, press down on the kimchi until you see liquid come up around your spoon. Close the containers. That’s the end of Day 1! You can eat some fresh while you wait for the rest to ferment.
13. Keep the closed containers at room temperature so it can ferment. At least once a day, open the containers and use a spoon to push down the kimchi, allowing the liquid to cover the top. You should see some bubbles when you press down (Photo 8). In winter, I generally leave it at room temperature for 3 days. In summer, I leave it out for 1.5-2 days. You can put it in the fridge as soon as you like the level of funk or sourness (keep in mind, it will continue to sour in the fridge as it ages)Feel free to taste it along the way 😊 Just make sure you pack it down very tightly any time you open it- you should see liquid come to the top and cover the vegetables- this protects the kimchi from being exposed to the air and growing fungus/mold (Photo 9- left has not been pushed down, right has been pushed down forcing the liquid to come to the top).
Step-by-Step Photos of the Kimchi Making Process

Photo 1: Napa cabbage chopped into bite-size pieces

Photo 2: Napa cabbage after sitting for 1.5 hours in salt
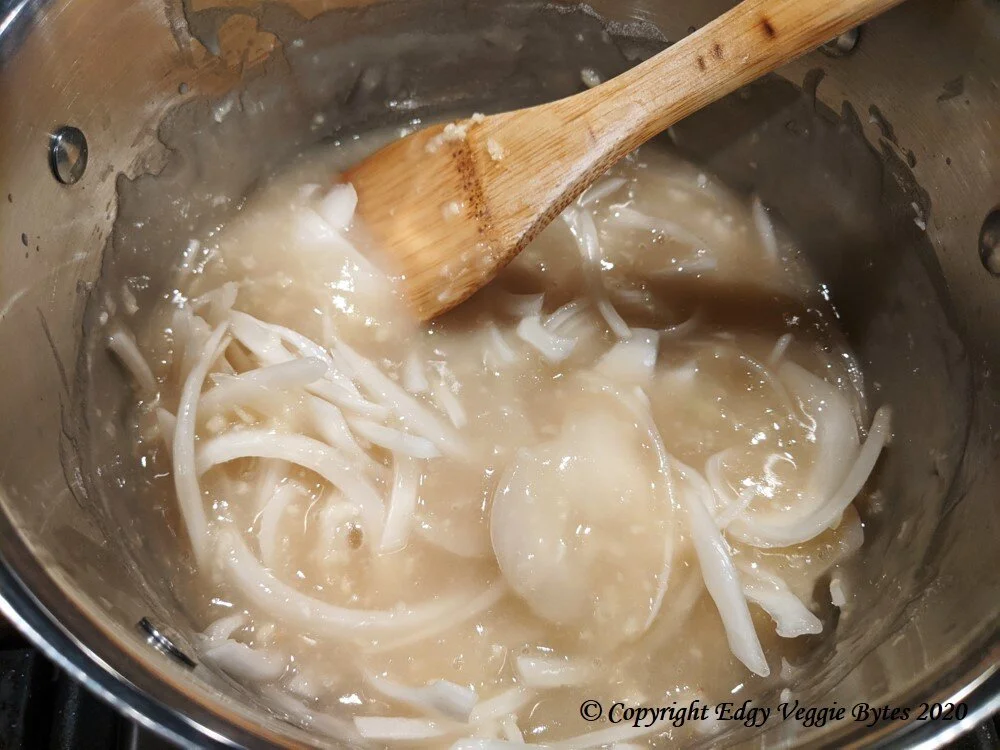
Photo 3: Garlic, ginger, onion mixed into the seasoning paste

Photo 4: Soy sauce, coconut aminos, and Korean red pepper mixed into seasoning paste

Photo 5: Before mixing in the scallions, chives, carrots, and daikon radish

Photo 6: After mixing in the rinsed and draining napa cabbage

Photo 7: Packed kimchi in a plastic container

Photo 8: Pressing down the kimchi after 1 day to force the liquid to come to the top (note the bubbles!)

Photo 9: The left side is kimchi on Day 3 before using a spoon to pack it down. The right side is what it looks like after I use a spoon to pack it down (push down so that the liquid covers the kimchi). This is incredibly important to protecting the kimchi growing fungus/mold.